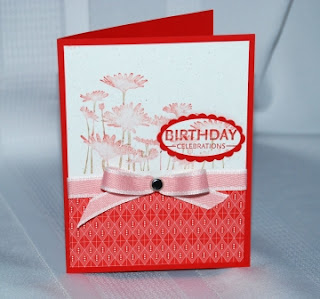
Here are 2 cards we created in My Stamp Club in February. We did different bow tying techniques. If you interested in learning more about joining my Stamp Club, email me and I can fill you in with the details.
Here is the Recipe:
Upsy Daisy Stamp Set
Poppy Parade Card Stock 5.5" x 8.5" & scrap piece
Naturals White Card Stock 4" x 3.25" & scrap piece
Poppy Parade Designer Series Paper (DSP) or Blushing Bride 4" x 2.25"
Blushing Bride Ink Pad
Poppy Parade Stampin Marker
Pear Pizzazz Stampin Marker
Blender Pen
Blushing Bride Ribbon
Glimmer Brads or a brad of your choice
Scallop Oval Punch
1-3/4" x 7/8" Oval Punch
Stampin Dimensionals
Snail Adhesive
- Stamp the Daisy Stamp in the Blushing Bride. Take the blender pen and clean off the stems of the daisies. Tip: each time you use the blender pen on a stem, clean it on scrap paper before removing another stem.
- Color the stems with the Pear Pizzazz Stampin Marker. Color the tips of the daisies with the Poppy Parade marker.
- Stamp the Daisy about 1/4" off the bottom of the Natural White card stock.
- Clean the stamp and repeat steps 1 thru 3 on top of the Daisy stamp for the oval, you can pick what daises you want, I picked a bunch with 3 daises, stamp this on your scrap Natural White card stock.
- Stamp Birthday Celebration or sentiment of your choice in the center of the top daises stamped in step 4. Using a Stamp-a-ma-jig can help you line the sentiment up just where you want it.
- Punch out the sentiment with the 1-3/4" x 7/8" Oval Punch.
- Punch out the scrap Poppy Parade card stock using the scallop oval punch.
- Adhere the sentiment oval to the Poppy Parade scallop oval using the Snail adhesive.
- Adhere the full stamped Daisy image to the Poppy Parade DSP, overlap about an 1/4".
- Wrap Blushing Bride ribbon around card stock where the 2 pieces come together, adhere with snail adhesive to the back.
- Tie bow and add brad to middle, see tutorial here: making bows. This card idea and bow making came from Mary Brown.
- Adhere to all to Poppy Parade card stock.
- Add sentiment with of course my favorite Stampin Dimensionals.
You can run the Daisy image thru the Big Shot Polka Dot embossing folder if you choose, like I did with the thank you card, before I adhered it to the card. Enjoy making these wonderful cards.
Inky Hugs!
Becky


No comments:
Post a Comment