Sunday, February 27, 2011

Birthday Nature Walk Card


This is one of the cards we created in my club meeting last Tuesday.  We learned how to tie 2 different kinds of bows.  For this card we used a fork to tie the bow.   Here is the recipe for this card:

Perfect Punches Stamp Set, wood #117022, clear #120516
Pear Pizzazz Ink pad #119784
Early Espresso Ink pad #119670
Daffodil Delight Ink pad #119667
Pear Pizzazz card stock, 4.5" x 8 1/2", #119795
Very Vanilla card stock, 4" x 5 1/4", #101650
Early Espresso card stock, 1 1/2" x 5 1/4", #119686
Botanical Gazette Designer Series Paper, 1 1/4" x 5 1/4", #121783 (pg 26 in Occasions Mini)
Pear Pizzazz Seam Binding, 14", #122330
Decorative Label Punch, #120907
2 x 1-3/8" Oval Extra-Large Punch, #119859

Stampin Dimensionals, #104430
Mini Glue Dots, #103683
Favorite adhesive

  1. Stamp leaves from Nature's Walk stamp set in Pear Pizzazz all over the 4"x5 1/4" Very Vanilla card stock.
  2. Stamp the butterfly in Early Expresso and the bee in Daffodil Delight a couple times on Very Vanilla card stock.
  3. Adhere the designer series paper (DSP) to the Early Espresso card stock. 
  4. Punch scrap Early Espresso card stock with the decorative label punch.
  5. Stamp the Happy Birthday stamp in Early Espresso on scrap Very Vanilla.
  6. Punch the Happy Birthday stamped image with the oval punch.
  7. Adhere the Happy Birthday to the Early Espresso decorative label punched piece.
  8. Adhere the Very Vanilla to the Pear Pizzazz card stock.  Adhere the Early Expresso with the DSP as shown.
  9. Adhere the Happy Birthday to the card with stampin dimensionals.
  10. Tie the Pear Pizzazz seam binding, here is a link to how to tie it using a fork:  Diane Gibbs, fork tying directions,
  11. Adhere the bow to card with the glue dots.
  12. All done, isn't it Botantical!
A special thanks to teammate Marie for all her patience in teaching me how to tie the bow with a fork.  Its takes some practice, but is simple once you get the hang of it.

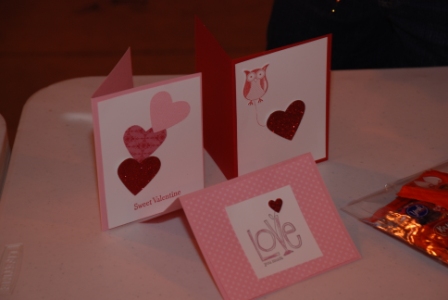
Here is a couple of other cards we created using the Upsy Daisy Stamp set, Poppy Parade, Blushing Bride, Whisper White colors, Hostess Level 1 In-Color Designer Series paper, brads, and Blushing Bride ribbon.


I have a new club forming, we meet once a month, learn new techniques, create a project or two with the new techniques.  Grab a friend or two and join the club.  Each month a club member gets to be the hostess and receives hostess benefits.  It so much fun to get together with your friends, make great projects and share great fellowship.

Happy Monday to you all!!

Inky Hugs,

Becky

Friday, February 25, 2011

Springtime Vintage Gift Card Holder

Happy Friday Everyone!!  My project for today is a gift card holder that can be used for a birthday, Mothers Day, thank you card, etc.  We created this along with 4 other projects at my Stamp Camp last Saturday.  I just love this, it is so simple and turns out beautifully, who wouldn't want to receive a gift card in this kind of packaging.   Many special thanks to Mary Vining who taught us how to make this for our shoebox swap at our quarterly team meeting at Ruth Murphy's home in Springfield, VA on Feb. 12.   What is a swap?  See after my project for a description of a swap.

So here is a picture of the gift card holder project:


Springtime Vintage Gift card holder

  
Gift card holder inside
 Here is the recipe:

Springtime Vintage DSP #121782, 8-1/2" x 3-3/4"
Pink Pirouette Card Stock #111351, 4" x 3"
Very Vanilla Card Stock #101650, 5" x 2-1/2", score at 1-1/8"
Baha Breeze Card Stock #111352, 2" x 4-3/16", score at 1" on the 2" side (see pics)
Very Vanilla Ribbon #117291, 16"
Sincere Salutations Stamp Set or any Stamp set of your choosing
Sticky Strip #104294
Dimensionals #104430
Crop-A-Dile #108362 or a standard hole punch
Favorite Adhesive

  1. Fold in half Sprintime Vintage DSP in half.
  2. Stamp sentiment on 1-1/2" flap on the Very Vanilla.
  3. Place sticky strip along the 2 side edges of the DSP as shown.
  4. Peal back sticky strip and adhere to the other side of the DSP.
  5. Adhere the Very Vanilla card stock to the Pink Pirouette card stock.
  6. Fold the Baha Breeze card stock on scored line.
  7. Punch 2 holes about an inch apart centered on the Baha Breeze card stock.
  8. Place Dimensionals on the Very Vanilla card stock as shown.
  9. Place Dimensionals on the Pink Pirouette card stock as shown.
  10. Adhere the Very Vanilla card stock to one side Baha Breeze card stock.
  11. Adhere the Pink Pirouette card to the other side of the Baha Breeze card stock, see pics.
  12. Tie ribbon thru the 2 hole, see pics.
  13. Slide gift holder into your piece of DSP


Sticky Strip on one side of Sprinttime Vintage DSP

Dimensional locations on the front side

Dimensional locations on the back side

Side picture showing how the dimensionals work
 
Springtime Vintage Gift card holder

Gift card holder inside
Now how easy is that?  Pretty easy, quick and beautiful, can't beat that!!

Enjoy making this project and send me pictures of some of your creations.

What is a swap? Demonstrators make multiples of one card/project and then swap that card or project (scrapbook page, 3-D item, etc.) for one created by another demonstrator. This happens when we get together at Stampin’ Up! events such as Leadership, Convention, and Regionals. We also swap when we get together at team events. Some host and/or participate in swaps by mail.
A Shoebox Swap. A Shoebox Swap is when you create a sample card or project and then put everything needed to make the card or project, including pre-cut paper, in a shoebox. Swap participants will create their own cards using the supplies you furnish and your sample as a guide.  Sounds pretty cool, doesn't it.  Yes it is a fun way to get different ideas that we can share with our clients.

Have a great weekend everyone!

Inky Hugs,

Becky

Saturday, February 19, 2011

Cupcake Hand Sanitizer Holder


Isn't this baby stinkin' cute!! 

Wouldn't this make a cute gift to give someone.  I made this and put my business card on the back.   Wouldn't this be just adorable for a teacher gift.  A welcome gift to someone, like a new member of your church. 

We created these today at my Stamp Camp.  I will share another project in the next couple of days

Supplies used:

Regal Rose card stock 2" x 11" (you can get 4 of these out of one 8-1/2: x 11" sheet of card stock, .
Whisper White and Basic Black card stock scraps
Cupcake Punch
3/4" Circle Punch
Create a Cupcake stamp
Cupcake Wheel
Basis Black ink for wheel
Regal Rose Ink pad
Basic Black Ink pad
Real Red ink pad or marker
Dimensionals
Sticky Strip
Magnetic Sheets
1oz. hand sanitizer (I got mine at Bath and Body Works)

Directions:
Score cardstock at 1/2, 1 1/2, 3 1/2, 4 1/2, 7 1/2, and 8 1/2.

Roll the Cupcake Crazy small roller across both sides of card stock.


Fold at all score lines.   Punch hole on the 1" scored space right after the firsts 1/2" score as shown.

Next place Sticky Strip on first 1/2" strip as shown.
Adhere Sticky strip to paper straight across.  The hand sanitizer will be in there tight.


Cut and add a 1/2" x 1/2" magnet piece as shown (make sure magnet line up and connect well.


Stamp the cupcake base in Basic Black on scrap Whister White paper.  Stamp the "Frosting part of the cupcake on scrap Whister white in Regal Rose Ink.  Stamp the Cherry on scrap Whisper White in Real Red.  Punch a wide oval punch out of Basic Black scrap paper.  Adhere the black bottom of cupcake to the black oval with your snail.  Attach the "Frosting" on top with dimensional (my favorite).  Attach the "cherry" with a little piece of a dimensional.

Sample in Regal Rose

Sample in Poppy Parade
Side View


Super easy, super cute and super fun!!  Special thanks for Kimberely Van Diepen for her directions on how to back this baby.

Hope everyone enjoys the rest of their weekend!

Becky


Monday, February 14, 2011

Valentines with Challenged Sports Exchange

Happy Valentines Day everyone.  May your day be filled with much love and happiness!!

I had the wonderful opportunity last Thursday to create Valentines with the Challenged Sports Exchange of Lynchburg.  The Challenged Sports Exchange provide recreational activities and sports programs for individuals with mental and/or physical challenges in the Central Virginia region.  Some of their activites include bowling, t-ball, fishing, basketball, golf, crafts, hand bells and much more.  It is their time to have fun and shine.

Fellow teammate Sarah Bates and I prepped 5 different Valentine cards (20 of each) and Valentine treat bags for the individuals to create.  We prepped a large portion of each card and they got to glue all the pieces on, stamp and punch hearts for the cards and treat bags.  Here are some pictures of some of the Valentine's created and the Awesome individuals creating their Valentines.


This is Adrian, and we mentioned his girlfriend Sandy and he got the biggest grin on his face


Melissa punching hearts

Casey learning how make the card

Bree creating a card, my brother-in-law Squirl calls her "trouble", I think she is aweome!!

Adrian working on his Valentines with the help of Lynchburg College students


Tina creating her Valentines


A Hug for Mom


Proud of his card

Sarah proud of her card


They are so awesome to work with.  They are so happy, always are smiling and I get so much joy from working with them.  Thanks to fellow teammates Sarah, June and Donna for their help and thanks to my son Daniel who took the pictures and helped too.  Also thanks to Toni for giving me the opportunity to work with these wonderful individuals.

Sunday, February 13, 2011

Cupcake Party Continues

I got to continue this delicious party on Tuesday.  Here is a picture of the cupcakes we got to enjoy.  Notice the paper coasters under the cupcakes.  I borrowed these "cupcake holders" from my mom and the holes looked to little to hold regular cupcakes, so I think they must hold the mini cupcakes.  So what do I do, I buy mini cupcakes.  Then I get home and the mini cupcakes were too little and slipped right through the holes.   So I used these paper coasters that my friend Marylee at work gave me (she was getting ready to throw them away) and they worked perfect.


Here is the other card we created.


Supplies used:
Melon Mambo card stock 5.5”x8.5” & 3.5”x2.5”
Whisper white card stock  5.25” x 4” & 3.25”x 2.25”
Big Shot
Framed Tulips embossing folder (121809, $7.95)
Create a Cupcake stamp set (Clear-121982, $16.95, Wood-121915, $22.95)
Pacific Point marker (120968, $3.50)
Chocolate Chip marker (100071, $3.50)
Melon Mambo marker (121074, $3.50)
Old Olive marker (100079, $3.50)
Dimensionals (104430, $3.95)

We had a great time making these cards and eating these cupcakes.  

For the other card that we created, see my previous post.

Stamp, eat cupcakes and enjoy!!

I'm ALWAYS HAPPY STAMPIN!!

Becky

Saturday, February 5, 2011

Cupcake Party

Happy Saturday Stampers!!!

I had Cupcake Party today and I am going to continue this delicious party on Tuesday evening.  We had a great time making Cupcake Cards and of course eating Cupcakes.  Notice the Red Glimmer Paper (the cherry and the small heart)....it is fabulous...and guess what the glimmer/glitter stays on the paper, all the beauty of glimmer without glittery mess.  I also used Champagne Mist Shimmer paint on the Very Vanilla Circle and it looked nice and shimmery, I don't think the picture does it justice.

Here is one of the cards we made:


Supplies Used:
Create a Cupcake Stamp Set, #121915 (wood), #121982 (clear)
Crumb Cake card stock 5.5"x8.5", #120953
Real Red card stock 5.5" x 1-3/4", #102482
Scrap Very Vanilla, Baja Breeze, Soft Suede, Red Glimmer Paper (#121790) Card Stock
Baja Breeze Seam Binding 10", #122331
Champagne Mist Shimmer Paint, #116806
Soft Suede Ink Pad, #115657
Elegant Lines Embossing Folder, #119277
Polka Dot Embossing Folder, #117335
2-1/2" Circle Punch, #120906
Build a Cupcake Punch, #121807
Small Heart Punch, #117193 
Sponge Daubers, #102892
Dimensionals, #104430
Favorite Adhesive (for me is the Snail #104332)


  • Fold Crumb Cake card stock in half.
  • Punch 2-1/2" circle out of Very Vanilla.  Sponge edges with soft suede ink, then sponge with the Champagne Mist Shimmer Paint.  Set aside to dry.
  • Run Real Red piece of paper thru Big Shot with Polka Dot embossing folder, and then run it again thru with the Elegant Lines embossing folder.
  • Tie Baja Breeze ribbon around red card stock in a knot and trim excess.
  • Adhere Real Red card stock to Crumb Cake card stock.
  • Stamp cupcake base stamp on strip of Soft Suede card stock with soft suede ink.
  • Punch out with Cupcake Punch.  Tip, when using the Cupcake Punch, cut paper in strips so you can slide in punch and not waste paper, see picture below:


  • Punch out "frosting" for Cupcake in Baja Breeze.  Daub some Champagne Shimmer Paint to "frosting".
  • Punch out "cherry" from top of the Cupcake punch using the Red Glimmer Paper.
  • Punch out small heart using the Red Glimmer Paper.
  • Attach the punched cupcake pieces, heart and cherry using dimensionals onto to the Very Vanilla circle.
  • Attach Very Vanilla Circle to Crumb Cake card stock.
  • Stamp Birthday sentiment on card
  • Stamp inside of card "Happy Birthday" if you choose.


 I will post the second Cupcake card we made on my next post.

For those local here in Lynchburg, you are welcome to attend my Cupcake Party on Tuesday.   If you cannot attend, you can participate long distance by placing an order on my My on-line store anytime between now and next Tuesday (Feb 8, 2011) and I will put 10 door prize tickets with your name on it in the door prize bowl.

I was reading Have fun watching the Super Bowl!!  I really don't have a favorite team, but will probably root for the Steelers.  I have a brother-in-law who is a huge Steelers fan.